Modular Traction Pads & Tailpads
GenRation has spent countless hours of design and testing to bring you traction pads that perform like no other. The deck pad was designed to give you extreme grip front-to-front and side-to-side, but be soft on the feet. The tail pad is made of a harder material with a pattern that will let you push your turns as hard as the pros. We use thin and lightweight premium EVA foam along with the strongest 3M adhesive on all traction pads.
Installation
Before installing any traction pad, be sure to clean the surface of your board with a water damp cloth and let it dry completely. For the tail pad, it is recommended you wipe that area with rubbing alcohol for optimal adhesion.
Step 1: Before sticking the tail pad, first install a center fin and then align the front of the tail pad kick with the trailing edge of the fin. Spread the pad wide as needed. You'll want to make sure there's not too much tail and rail showing on the sides of the tail pad in case you need to move that back foot for turning! Now go ahead and stick the tail pad and apply pressure in all areas to ensure a good stick. Let the glue dry for at least 12 hours before surfing.
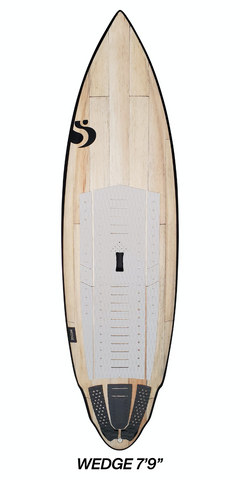
Step 2: Your deck pad's pieces should be labeled according to the image below. Keep in mind that unless your board is over 9 feet you won't need all of the middle pieces. Before sticking any of the deck pad, first line up all of the center pieces you'll need to start building out your deck pad. While lining up the first centerpiece (C1), make sure that one of the little dots in the center of the triangle is directly over the board's vent hole (above the handle) so it can breathe like the image below. Use the vent hole, handle and wood pattern of the board as a guide to center the pieces with the stringer of the board. The completed deck pad can be up to 2 inches away from the tail pad, so do not worry if it doesn't space out perfectly. Go ahead and stick these pieces and apply pressure for optimal adhesion (especially around the edges).

Step 3: Cut out the handle with the supplied razor, like the images below. You can find the handle by applying pressure on the pad and creating an indentation. First create an X in the middle of the handle. Then remove the excess pad by cutting against the edge of the handle at a slight angle. Do not worry about cutting into the handle you will not damage it.


Step 4: Build out the sides of the pad starting from the top. You can get creative here. Only go as wide as your board needs. Be careful not to use too much pad as wide deck pads aren't necessary when your foot placement should be as close to the center of the board as possible.

The end result should look something like the photos below (we will be posting more examples as they come in). Be sure to let the pad's glue dry for at least 12 hours prior to surfing.